Video walkthrough coming soon
The written steps below cover everything in the meantime.
About 6 min to follow along
When you’re done
- Any client found by name, phone or email
- Colour formulas, lash maps and allergies saved for next time
- Do-not-call and do-not-text wishes respected by everyone
- 1
Find a client
In the left menu, click “Clients”. The cards at the top give quick numbers, such as your total clients and how many are lapsed.
In the list:
- Type in “Search clients” (1) — a name, phone number or email.
- Use the sort menu (2): “Last visit”, “Lifetime spend”, “Visits” or “Name”.
- Click a tag (3) to show only clients with that tag. “All clients” shows everyone again.
- Click “Filters” to narrow the list by “Last visit”, “Visits”, “Spend” or “Offers” — for example everyone whose last visit was “Over 90 days ago”. “Clear filters” shows everyone again.
The Marketing column shows whether each client agreed to SMS and email offers.
Tip: The search box in the top bar works from any page — press / to jump into it.
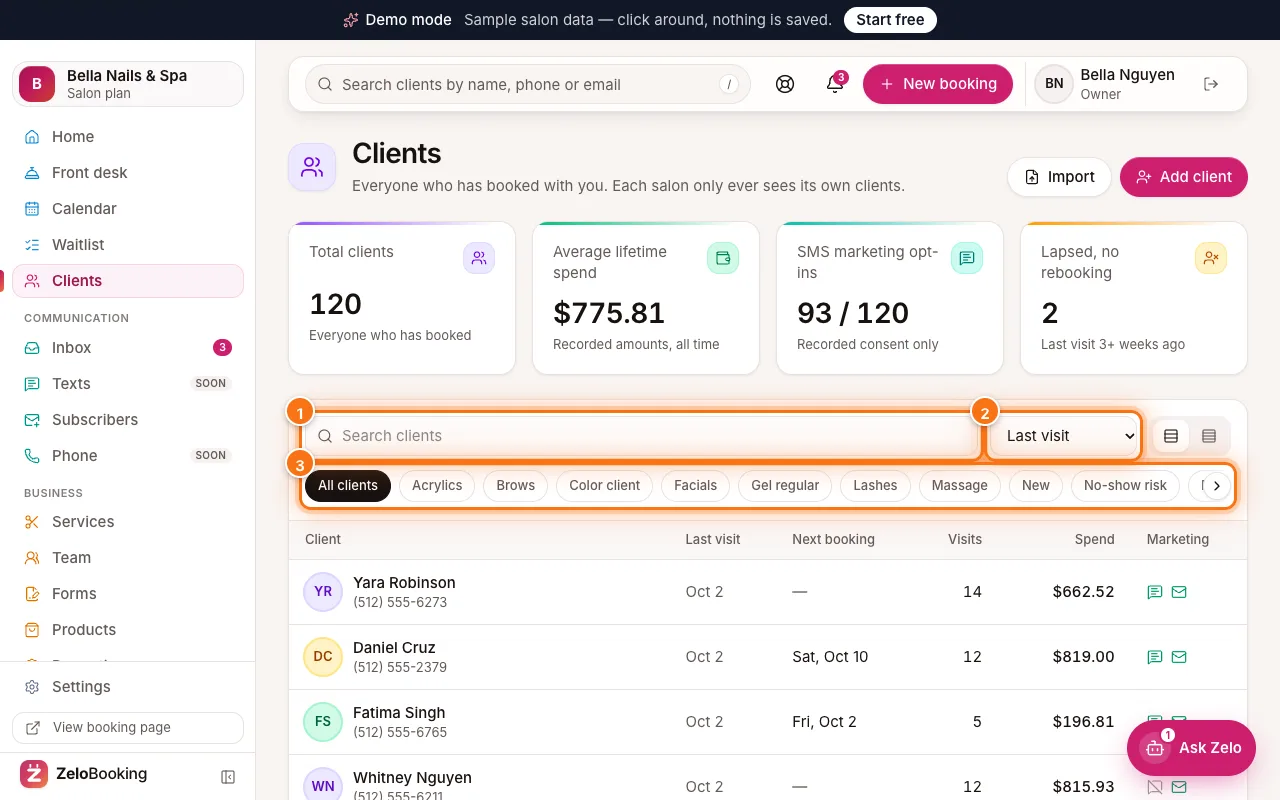
The Clients list with the search box (1), the sort menu (2) and the tag filters (3) highlighted - 2
Add a client by hand
Click “Add client” at the top right of the Clients page.
- “First name” (1) is required; “Last name” is optional.
- “Mobile” (2) or “Email” — you need at least one, so they get reminders.
- “Birthday”, “Tags” (comma separated) and “Notes” are optional. Notes are only seen by your team.
Click “Add client” (3).
Tip: Moving from another system? Import everyone at once instead — see “Import your client list”.
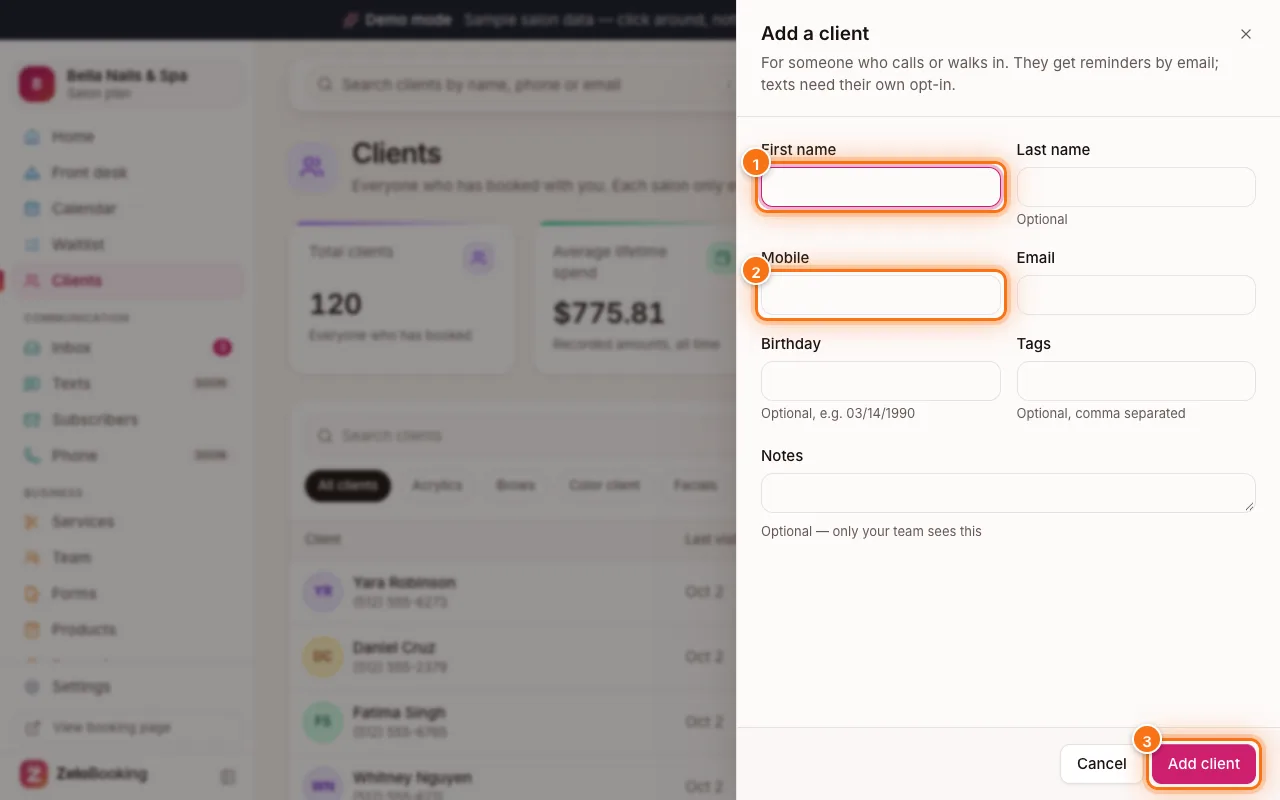
The Add a client form with First name (1), Mobile (2) and the Add client button (3) highlighted - 3
Open a profile
Click a client’s name. The profile shows their contact details, how many visits they’ve had, what they’ve spent, any no-shows, and their upcoming and past appointments with what was recorded at each visit.
Further down:
- “Messages” — every email, text and app notification to or from them, and whether it arrived.
- “Forms” — their signed forms (click one to read it, or “PDF” to download it) and any form links still waiting.
- “Loyalty points” (Pro) — their balance and recent points.
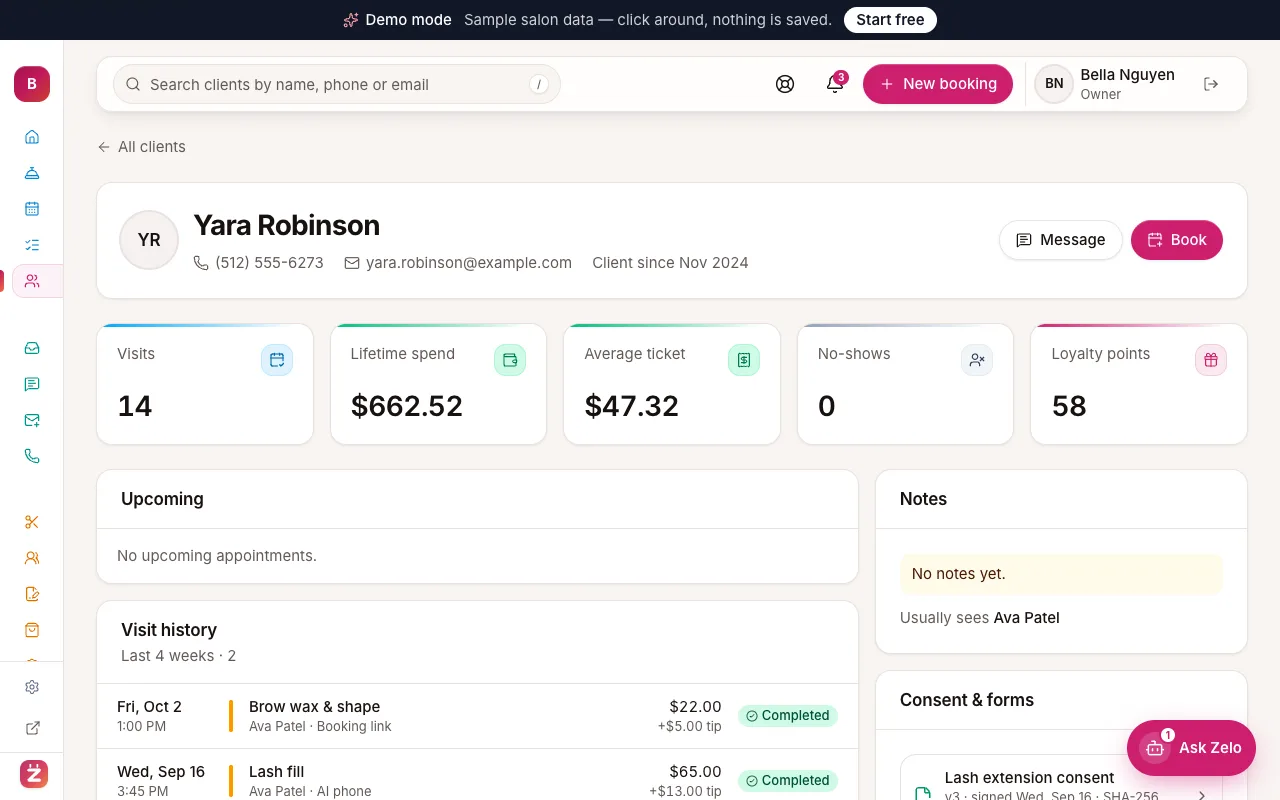
A client profile with visits, spend, notes and upcoming bookings - 4
Add service notes
On the profile, find “Service notes” and click “Add note”.
- Choose the kind (1): “Formula”, “Allergy / sensitivity” or “Note”.
- Type the note (2) — for example the colour formula and timing.
- Optionally pick the service it’s for (“Any service”) and click “Add photo” for before/after pictures (up to 4).
Click “Save note” (3). Allergies show as an alert at the top of the profile so nobody misses them.
Tip: Client photos are private — they’re never put on your website or in your media library.
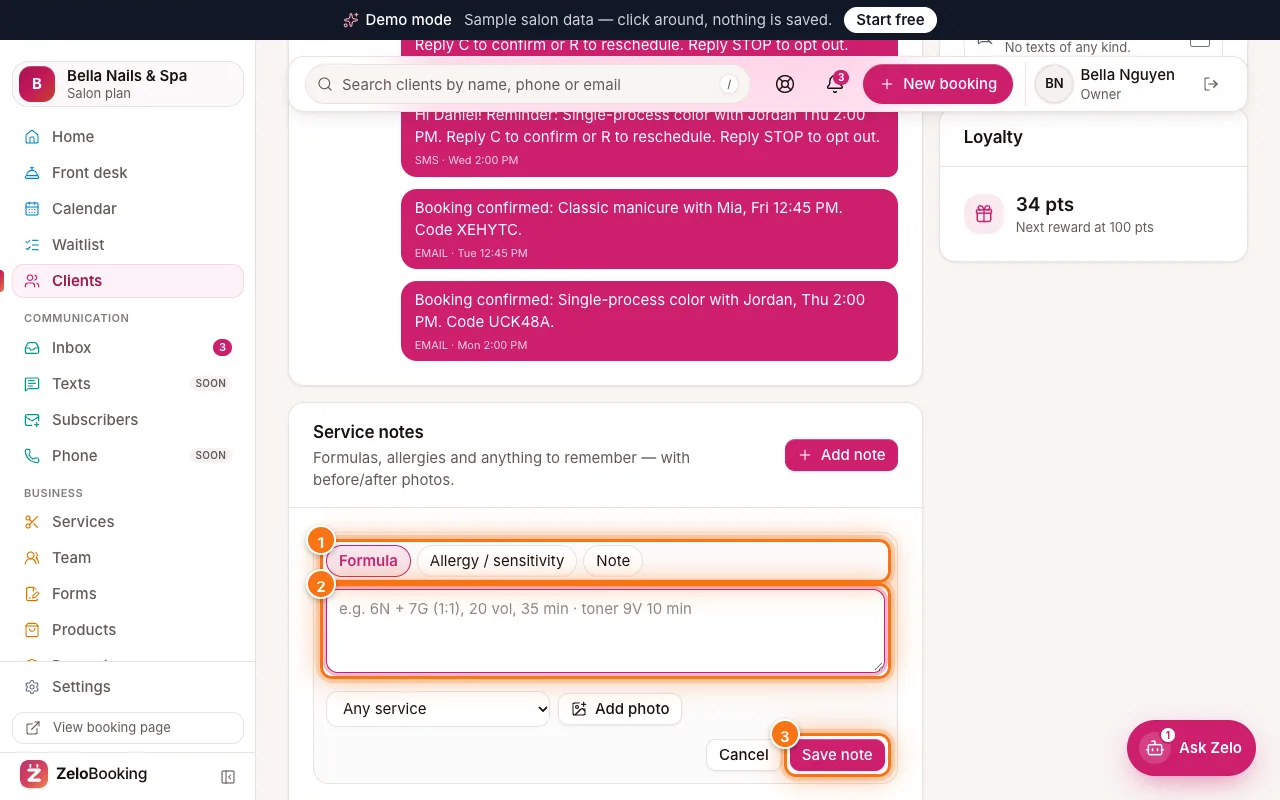
A new service note with the kind of note (1), the note text (2) and Save note (3) highlighted - 5
Respect contact wishes
Tick “Do not call” (1) if the client doesn’t want calls, or “Do not text” (2) for no texts of any kind. Everyone on your team sees and follows this.
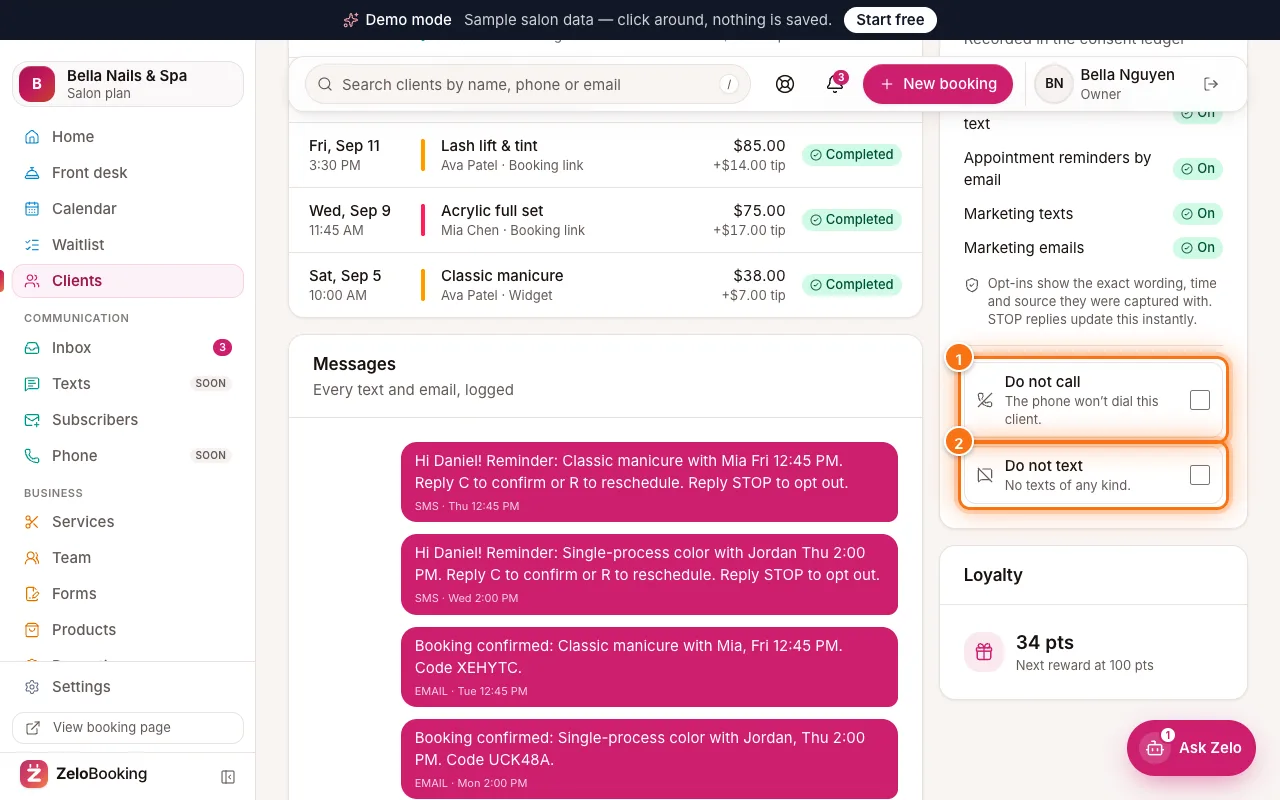
A client profile with the Do not call (1) and Do not text (2) boxes highlighted - 6
Edit, merge or archive a client
At the top of the profile:
- “Edit” changes the name, mobile, email, birthday, tags and notes. A new mobile or email needs the client’s own opt-in before texts or offers go to it.
- “Merge duplicate” (owners and admins) combines two records of the same person: find the other record, choose “Which record do you keep?” and click “Merge records”. Appointments, payments, signed forms, notes, messages and points move to the record you keep; the other one is archived for good.
- “Archive” takes a client out of your list and booking search. Their history stays — “Show archived clients” at the bottom of the Clients page brings them back.
Tip: Merging can’t be undone, so ZeloBooking asks you to confirm it’s you first.
- 7
Handle privacy requests
If a client asks what you hold about them, or asks you to delete it, open their profile and find “Privacy”.
- “Download their data” saves a file with everything you hold about them.
- “Delete their data” permanently removes their personal details and private photos — type DELETE to confirm, and you’re taken back to your client list. Payment records, opt-outs and signed forms you must keep stay, without their name.